50 Examples of How to Label Images for Image Classification
Are you looking for ways to label images for image classification? If so, you’re in luck! Here are 50 examples of how to label images for image classification.
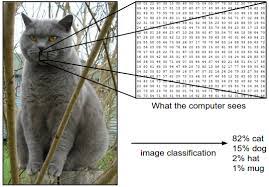
Some examples of how to label images for image classification include:
-Classifying an image as a person, object, or scene
-Labeling an image with keywords related to the content of the image
– labeling an image with geographical coordinates
– labeling an image with subject matter terms from a dictionary
– labeling an image with sentiment analysis results
how to add href to image
Labeling images for image classification can be a daunting task. There are many different ways to do it, and the right way for your data set may vary. In this article, we will cover 50 examples of how to label images for image classification.
1. Use filename extensions
The first way to label images is to use filename extensions. Simply add a .jpg, .png, or .gif extension to the filename of the image. This will automatically assign the image to a specific category in a machine-learning model.
2. Use demographic information
Another way to label images is to use demographic information. This can be anything from age ranges to gender data. Simply include information about the demographics of the image in the filename.
3. Use object IDs
Another way to label images is by using object IDs. This is simply a numeric identifier that relates an image to another object in a data set. Object IDs can be found by using the Object ID tool in ArcGIS Pro or by using the Image Geometry tool in QGIS.
4. Use feature classes
Another way to label images is by using feature classes. This is simply a group of features that relate an image to another data set. For example, you could create feature classes for roads, parks, buildings, and so on in your data set and then assign an image to a specific feature class using its object ID or filename extension.
np resize image
Labeling images for image classification can be a daunting task if you’re not familiar with the different tools and techniques available. Here are 50 examples of how to label images for image classification using different machine-learning models.
1. generate a binary classifier using the Google Cloud Vision API
2. create a convolutional neural network (CNN) model to identify objects in an image
3. use a deep learning algorithm, such as LSTM or recurrent neural networks (RNNs), to extract semantic information from an image
4. use a Support Vector Machine (SVM) to distinguish between different types of objects in an image
5. use a Random Forest model to predict the probability of a specific object being present in an image
6. use a TF-IDF metric to discriminate between different categories of objects in an image
7. use a K-means clustering algorithm to group similar objects together in an image
8. use affine transformations, such as rotation, scale, and translation, to shift and reorganize objects within an image
9. use convolutional activation functions, such as rectified linear units (ReLU), to reduce noise and improve accuracy when training machine learning models
10. crop an image so that only relevant content is visible
11. improve accuracy by pre-processing images with natural language processing (NLP) tools, such as handwriting recognition or text classification
12. load images into a deep learning model using pret
CSS background image padding
There are a few ways to label images for image classification, but the most common way is to use the src attribute. You can also use the id attribute, but this method is less common.
To use the src attribute, you just need to add a tag in your Html file and provide a path to your image file. For example, if you have an image called “cat.jpg” located in the same directory as your Html file, you would include the following code:

To use the id attribute, you need to create a unique identifier for your image. You can then use that ID when referencing it in your Html file. For example, if you have an image called “cat1.jpg” located in the same directory as your HTML file, you would include the following code:
Use CSS to set the padding around an image’s border to help it stand out from other content.
Padding is the space between an element’s border and content. You can set the padding on all four sides of an element with the padding property.
When you set padding, you can also set its horizontal and vertical positions at the same time by using the padding-top, padding-right, padding-bottom, and/or padding-left properties.
Use different padding values for different types of images, depending on their purpose.
Padding is the space around an image, between the image and the edge of its container. Padding values are set in pixels, and you can use different padding values for different sides of an image.
For example, you might want to use a smaller padding value for images that are meant to be clickable, so that there’s less space between the image and the cursor when someone hovers over it. On the other hand, you might want to use a larger padding value for images that are meant to be decorative, so that they have more breathing room within their containers.
Experiment with different methods to achieve the desired effect.
In photography, there is no one “right” way to do things. Every photographer has their own unique style, and the best way to find out what works for you is to experiment with different methods until you find the ones that produce the results you are looking for. Try different techniques, lighting setups, composition styles, and post-processing effects until you develop a personal workflow that gives your photos the look and feel you are after.
Use a transparent background to let the image’s content show through.
If you want to create a more subtle effect, use a transparent background. This will allow the image’s content to show through, creating a more subtle effect. You can also use this technique to create an interesting layered look.
Use rounded corners and a contrasting color to make your text stand out.
Rounded corners and a contrasting color can make your text stand out. This can be helpful when you want to highlight important information or make a statement. Be careful not to use too much contrast, as it can be overwhelming. A good rule of thumb is to use a light background with dark text or vice versa.
Keep your css consistent across all your images so they look coordinated.
If you want your images to look consistent and coordinated, keep your CSS (Cascading Style Sheets) the same across all of them. This means using the same fonts, colors, spacing, etc. on each image. By doing this, you’ll create a cohesive look that will help your website or blog stand out.
Use a CSS grid system to lay out your images in a more organised way.
Organising images on a website can be difficult, however using a CSS grid system can help. A CSS grid system is a way of dividing up a webpage into sections, which can then be used to place elements, such as images, in a more organised way. This can make your website look more professional and tidy.
Save yourself time by using premade stylesheets or plugins.
When you’re first starting out, it’s tempting to want to do everything yourself. You think that if you don’t code it all from scratch, it won’t be as good or you’ll never learn anything. However, there’s no shame in using premade stylesheets or plugins. In fact, it can actually save you a lot of time and headache in the long run.
There are tons of free and paid resources available online, so do some research and find something that works for you. And don’t forget to read the documentation! It may seem like a pain at first, but trust me, it will make your life a lot easier down the road.