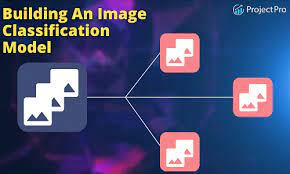
A Guide to Setting Up a Python-based Image Classification System
Python is a high-level, interpreted, general-purpose programming language, created on December 3, 1989, by Guido van Rossum, with a design philosophy entitled, “There’s only one way to do it, and that’s why it works.”
In the Python language, that means explicit is better than implicit. It also gives rise to the infamous Python telegraph pole analogy attributed to creator Guido van Rossum, which goes like this:
There is beauty in π because it is an infinite decimal and never repeats. Just like there is beauty in a perfect circle. There is also beauty in π because of the way it is derived from the circumference of a circle. The relationship between π and circles is simple and elegant.
Circles are everywhere in nature and they have been used throughout history for art, architecture, science, and religion. The circle is a symbol of perfection and unity. It represents the sun, moon, earth, and sky. It is a symbol of protection and infinity.
The number π has been studied for centuries by mathematicians and scientists. It appears in many formulas in physics and mathematics. It has been used to calculate the circumference of a circle since ancient times. π is an irrational number; it cannot be expressed as a rational fraction (a ratio of two integers). This means that its decimal representation never ends and never repeats itself.
offset images
When creating an image classification system with Python, it is often necessary to offset the images in order to create a more accurate training dataset. Offsetting the images means that the training data will be more representative of the actual distribution of images in the real world.
There are a few different ways to offset images, but the most common method is to use the Python Imaging Library (PIL). The PIL library provides a number of functions for offsetting images, including the crop() function.
To offset an image using the PIL crop() function, you first need to calculate the desired amount of offset. This can be done by dividing the width or height of the image by two. For example, if your image is 800×600 pixels, you would want to offset it by 400 pixels.
Once you have calculated the amount of offset, you can then use the crop() function to actually crop the image. The crop() function takes four arguments: the x and y coordinates of the top-left corner of the cropped region, and the width and height of the cropped region.
For example, if you wanted to crop an image that was 800×600 pixels so that only the bottom-right quarter of the image was visible, you would use a crop() call like this:
crop(400, 300, 200, 200)
This would result in an image that was 200×200 pixels in size.
pillow images
There are a number of ways to get pillow images, but the easiest is to simply download them from the internet. You can find a variety of websites that offer pillow images, or you can search for specific terms on Google Images.
Once you have your images, the next step is to process them so that they’re ready for classification. The first thing you’ll need to do is resize the images to a consistent size – this is important so that your classifier doesn’t get confused by different-sized inputs. You can either resize them all manually, or use a tool like Pillow’s Image.resize() function.
Once your images are all the same size, the next step is to convert them to grayscale. This is again important for consistency, and also because most image classification algorithms work best with grayscale inputs. You can convert an image to grayscale using Pillow’s Image.convert() function.
Now that your images are in a consistent format, they’re ready for classification!
python base image
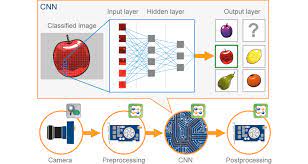
Python is a powerful programming language that can be used for developing a wide range of applications, including image classification systems. In this blog article, we’ll provide a guide to setting up a Python-based image classification system.
We’ll start by briefly discussing the concept of image classification and some of the popular Python libraries that can be used for this task. We’ll then walk through the steps involved in setting up a simple image classification system using the Python library scikit-learn. Finally, we’ll provide some tips on how to improve the performance of your image classification system.
Python is a versatile language that can be used for a variety of purposes, including image classification.
Python is a high-level, interpreted, general-purpose programming language, created on December 3, 1989, by Guido van Rossum, with a design philosophy entitled, “There’s only one way to do it, and that’s why it works.”
In the Python language, that means explicit is better than implicit. It also gives rise to the infamous Python telegraph pole analogy attributed to creator Guido van Rossum, which goes like this:
There is beauty in π because it is perfect; there is none in Euclid’s Elements because they are merely adequate. Just so there is elegance in a well-written program because it does what it says simply and directly —and there should be no mystery about what it does. The fact that programs can be expressed in fewer lines of code using Python than in some other languages is sometimes quoted as evidence of Python’s superiority. Although I am not unappreciative of such arguments (fewer bugs per line of code must be good!), my own experience tells me that you can write bad code in any language.
Setting up a Python-based image classification system is relatively simple and can be done with a few tools.
To get started, you’ll need to install the Python Imaging Library (PIL) and the scikit-learn library. Once you have these installed, you can begin creating your classification system.
The first step is to create a training set of images. This can be done by manually collecting a group of images that belong to the same category (e.g., pictures of cats), or using a web crawler to automatically download a set of images. Once you have your training set, you’ll need to label each image with its class (e.g., cat).
Next, you’ll need to extract features from each image in your training set. This is typically done using a technique called “bag of visual words.” This approach involves representing each image as a collection of small patches, and then constructing a “dictionary” of visual words by finding recurring patterns in these patches.
Finally, you’ll need to train a classifier on your training data. This can be done with any number of machine learning algorithms (e.g., support vector machines, k-nearest neighbors, etc.). Once your classifier is trained, you can use it to predict the classes of new images.
Once your system is set up, you can begin classifying images with Python.
To do this, you’ll need to first install the Python Image Library (PIL). PIL is a free library that adds image processing capabilities to your Python interpreter.
Once PIL is installed, you can use it to classify images. For example, let’s say you have an image of a dog and you want to know what breed of dog it is. You can use PIL to compare the image against a database of known dog breeds.
If you don’t have a specific image in mind, you can also use PIL to generate random images. This can be useful for training your classifier or for testing its accuracy.