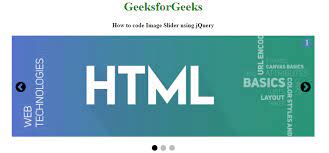
3 Steps To Create A Simple Image Slider Using HTML And JavaScript
Image sliders are a popular way to display multiple images on a website. They can be used to display a gallery of images, product photos, or even slideshows. In this tutorial, we’ll show you how to create a simple image slider using HTML and JavaScript.
The first step is to create an HTML file with the necessary markup. We’ll start by creating a container element with an id of “slider”. Inside this element, we’ll add a div with an id of “slider-wrapper”. This div will contain all of the images that we want to display in our slider.
Next, we’ll need to add some CSS to style our slider. We’ll set the width and height of our slider wrapper to 100%. Then, we’ll set the overflow property to hidden so that only one image is visible at a time.
Now that our HTML and CSS are set up, we can start adding some JavaScript. We’ll begin by getting a reference to the slider wrapper element. Then, we’ll get all of the child elements inside of this element and store them in an array.
Finally, we’ll write a function that will display the next image in the array when called. This function will set the width of the next image equal to the width of the slider wrapper element. Then the function will animate the margin-left property of the slider wrapper element so that the next image is displayed.
That’s it!
TensorFlow loads images from a directory
If you’re looking to create an image slider using HTML and JavaScript, there are a few things you’ll need to do. First, you’ll need to create a directory for your images. Next, you’ll need to load the images into the directory. Finally, you’ll need to create a JavaScript file that will handle the image slider functionality.
To start, create a new directory on your computer. For this example, we’ll call it an “image-slider”. Inside this directory, create two more directories: “images” and “js”. The “images” directory is where you’ll store all of the images that you want to use in your image slider. The “js” directory is where you’ll store the JavaScript file that will handle the image slider functionality.
Next, download the images that you want to use in your image slider and save them in the “images” directory. Make sure that each image has a unique name so that it can be easily identified later on.
Finally, create a new file in the “js” directory and name it “image-slider.js”. This file will contain all of the necessary JavaScript code for the image slider functionality.
In the “image-slider.js” file, start by including the following lines of code:
var images = [ ‘1.jpg’, ‘2.jpg’, ‘3.jpg’ ];
var current image index = 0;
HTML background image not showing

If you’re having trouble getting your HTML background image to show up, there are a few things you can try. First, make sure that the path to your image is correct. If your image is in a different directory than your HTML file, you’ll need to specify the path in the code. Second, make sure that the image file is saved in the correct file format. Generally, gif and jpeg files will work with HTML background images. Finally, make sure that the image is the right size. If your image is too large or too small, it might not show up on the page.
If you’ve tried all of these things and your background image still isn’t showing up, you can try using a CSS stylesheet to control how the image appears on the page. CSS stands for Cascading Style Sheets, and it’s a language that allows you to control how HTML elements are displayed on a web page. If you’re not familiar with CSS, there are plenty of resources available online to help you get started.
javascript image class
If you’re looking for a quick and easy way to add an image slider to your website, you can do it using HTML and JavaScript. In this article, we’ll show you how to create a simple image slider using these two technologies.
First, you’ll need to create an HTML file that will serve as the basis for your image slider. This file should include the following elements:
A container element (e.g. a div) with an id or class that will be used to reference the slider in your JavaScript code
A series of img elements inside of the container, each containing the source of an image that you want to include in the slider
Next, you’ll need to create a JavaScript file that will contain the code for your image slider. This file should include the following:
A reference to the container element from your HTML code
A variable that will hold the array of images that you want to include in the slider
A function that will initialize the image slider by setting the src attribute of the first img element to the first element in the array of images
A function that will change the src attribute of the IMG element to the next element in the array of images when called
Finally, you’ll need to call the initialize function when your page loads. You can do this using either inline JavaScript or an external JavaScript file.
That’s all there is to create a simple image slider using HTML and JavaScript!
In order to create a basic image slider using HTML and JavaScript, you will need to create a container element, as well as two child elements within that container.
The first child element will be used to hold the image that is currently being displayed. The second child element will be used to contain all of the other images in the slider and will be hidden from view initially.
To create the basic structure of your image slider, you can use any type of HTML element you desire. However, it is important to note that the container element must have a defined width and height, as well as a position value of either relative or absolute. In addition, each of the child elements must also have a width and height set so that they are sized appropriately.
Within your JavaScript code, you will need to create a variable that stores a reference to the container element. Then, you will need to create another variable that stores a reference to the first child element within the container (this should be the one with the image).
Next, you will need to write a function that contains all of the logic for your image slider. This function should take in two parameters: an array of images and an index number. Within this function, you will need to set the src attribute of your first child element equal to index 0 of your array (this is how you change which image is being displayed).
The first child element should be an image tag. You can then use CSS to style this image tag however you’d like.
If you want to center the image, you can use the text-align property. For example:

If you want to make the image bigger or smaller, you can use the width and height properties. For example, if you wanted to make the image twice as big, you would use this code:
The second child element should be a button. This button will be used to trigger the image slider.
The button should have the following attributes:
– `id=” trigger”`
– `class=”slider__trigger”`
– `aria-label=”Toggle Slider”`
– `type=” button”`
The image slider consists of two main parts: the images and the buttons. There are two types of buttons, those that move between images and those that change the currently visible image. Moving between images is accomplished by setting the left or top property of the image wrapper to a negative value equal to the width or height of an image respectively. This will cause all of the images except for the one we want to be visible to be pushed offscreen. To change which image is currently being displayed we can use either a simple CSS class toggle or JavaScript to set which image has its z-index property set to a high number
When the button is clicked, the image tag will be replaced with another image tag containing a different image.
This can be useful if you want to change the image displayed on a page without reloading the entire page.
You can keep track of which images have been shown by using a variable and incrementing that variable each time the button is clicked.
You can also use the modulo operator to show a different image each time. The modulo operator returns the remainder of a division, so if you divide the current image number by the total number of images, you’ll always get a number between 0 and 1 that you can use to select an image.