The 9 Things You Need to Know Before Vectoring an Image in Procreate
If you’re looking to add some creativity and pizzazz to your illustrations, vectoring an image is a great way to go. With Procreate, it’s easy to get started vectoring an image. In this tutorial, we’ll take you through the basics of vectoring an image in Procreate.
First, you’ll need to open up your image in Procreate. You can do this by clicking File > Open… or pressing Command+O on a Mac. Once the image is open, you’ll want to select all of the text in the document and use the Pencil tool (M) to create a vector outline. Next, use the Rectangle Tool (R) to create shapes around each of the selected text boxes. You can use these shapes as guides when vectoring the rest of the image.
To begin vectoring, first make sure that your guides are active by selecting them with the Selection Tool (V). Next, use the Vector Mask toolbar button (the three circles next to the Undo button) to create a mask around each guide. This will protect your original artwork from being affected by your vectors. Once your masks are created, you can start drawing your vectors inside each mask using either the Line or Path tools (U and I respectively). Be sure to set your stroke weight accordingly so that your lines are smooth and consistent throughout your illustration. When you’re finished drawing your vectors, press Enter or Return to finish editing your Illustrator file
satellite image processing
In this blog post, we will be discussing the steps necessary to vector an image in Procreate. Vectoring an image gives it a more polished, professional look and can make your artwork look more dynamic and fluid. There are a few things you need to know before vectoring an image in Procreate:
1. Choose the Right File Format
The first step is to choose the right file format for your vector project. If you are only going to be using one image for your project, then you can simply save it as a PNG or JPG. If you plan on using multiple images, however, then you will need to use a vector graphic format like PDF or EPS.
I prefer to vector in PDF because it allows me to include multiple images within the same document without having to worry about resolution issues. EPS is also great for large projects, but it can be difficult to work with when trying to include small details within your graphics.
2. Edit the File Size
When saving your file, be sure to keep its size under 10MB so that it will load quickly on your computer screen. Larger files will take longer to load and may cause problems when opening the file in Procreate.
3. Pre-Vector Your Images
Before starting any vectoring project, it is important to pre-vector your images so that they will be easily editable within Procreate. By pre-vectoring your images, you can ensure that all of the
images tilt online
In the world of photo editing, vectoring an image is a popular way to add more realism and detail to your images. Vectoring is the process of creating a graphic representation of an object or figure using mathematical formulas. This can be done in a variety of software programs, including Adobe Photoshop and Procreate. Here are nine things you need to know before vectoring an image in Procreate:
1. Choose the Right Tool for the Job: Before starting any vectoring in Procreate, you’ll want to make sure you have the right tool for the job. For example, if you’re going to vector an image of a person, you’ll want to use Procreate’s humanoid tools instead of its vector art tools.
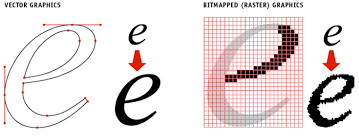
2. Understand the Resolution: When vectoring an image, it’s important to understand the resolution at which you’re working. If your resolution is low (for example, if you’re using a smartphone), your vectors will look pixelated and fuzzy. If your resolution is high (for example, if you’re using a desktop computer), your vectors will look sharper but may take up more space on your screen.
3. Use Reference Photos: While vectoring an image, it’s always helpful to have reference photos handy. This way, you can make sure that your vectors are accurate and consistent with the original image.
4. Set Up Your Tools: Before starting any vectoring process, make sure that all of your tools are set
image list
1. What is vectoring an image?
Vectoring an image is a process of transferring shapes and outlines from one image to another. This can be used to create a variety of designs, including logos, icons, and illustrations.
2. How does vector work?
Vectoring software allows you to create vectors from scratch or from existing images. Once you have created your vectors, you can use them to create new designs or to modify existing ones.
3. What are some advantages of vectoring over other image editing methods?
Vectoring offers a number of advantages over other image editing methods, such as being more accurate and versatile. Additionally, vectoring can be used in a variety of different formats, making it ideal for creating logos, icons, and illustrations.
4. What are some common vectoring tools?
There are a number of different vectoring tools available online, including Adobe Photoshop and Procreate. Both offer extensive capabilities for creating vectors and modifying images.
5. How do I start vectoring an image?
The first step is to select the image you want to vector. Next, open the desired vectoring software and select the appropriate tool from the toolbar. You will then need to select the area you want to vector and start drawing your outline.