JavaScript Preload Image: 6 Steps To Include Preloading Your Images
Preloading images is an important part of creating a smooth and responsive user experience. When done correctly, preloading images can make your web pages load faster and feel more responsive.
There are a few different ways to preload images in JavaScript, but the most common and reliable method is to use the Image() object.
The Image() object can be used to preload images and take advantage of caching mechanisms so that the image is already available when needed.
Here’s how you can use the Image() object to preload images in your web pages:
1. Create a new Image() object for each image you want to preload.
2. Set the src attribute of the Image() object to the URL of the image you want to preload.
3. Add an onload handler function for each Image() object so that you know when the image has been loaded successfully.
4. Make sure that any code that depends on the image being loaded is inside the onload handler function so that it doesn’t run until after the image has been loaded successfully.
5. Repeat steps 1-4 for each image you want to preload.
6. Preloading multiple images at once can improve performance even further, so keep that in mind as well!
colorbar image
Preloading images is a common practice in web development. It is often used to improve the user experience by providing visual feedback that something is happening while the content is being loaded.
The image below shows a colorbar image that is loading. The colorbar indicates the progress of the image load.
As you can see, the colorbar image is a great way to provide feedback to the user that something is happening while the content is being loaded. By preloading your images, you can make sure that the user always has a positive experience when using your website or application.
Preloading images is a great way to improve the user experience of your website.
When a user visits a website, the browser will automatically start loading resources such as images. However, if there are too many resources or if the network connection is slow, this can cause the page to load slowly.
Preloading images helps to avoid this problem by loading some of the images before the user even requests them. This means that when the user does request them, they will already be available and can be displayed immediately.
This can make a huge difference in terms of how quickly your pages load and how responsive your site appears to users. It also reduces bandwidth usage since fewer resources need to be downloaded overall.
If you have a lot of images on your site or if users are likely to visit multiple pages, preloadingimages is definitely something you should consider doing. It’s easy to do and can have a big impact on performance.
By preloading images, you can ensure that they are displayed correctly and without delay.

Preloading images is important for a number of reasons. By doing so, you can make sure that the images are displayed correctly and without delay. This is especially important if you are using them for navigational purposes or want to avoid a jarring user experience.
In addition, preloading images can help improve your site’s performance. When the browser knows that an image is going to be needed, it can begin loading it in the background while the rest of the page loads. This means that when the image is needed, it will already be available and won’t need to be downloaded again.
Finally, preloading images can also be helpful for SEO purposes. Google’s algorithm takes page load time into account when ranking pages, so anything you can do to improve your site’s performance will likely also improve your position in search results.
There are a few simple steps you can take to preload your images.
1. Use the correct image format.
When it comes to image format, there are three main types: JPG, PNG, and GIF. Each of these formats has its own benefits and drawbacks. For example, JPG images are great for photos because they have a small file size while still maintaining high quality. However, JPGs don’t support transparency, so if you need an image with a transparent background, you’ll need to use a PNG or GIF instead.
2. Optimize your images for the web.
Images that are optimized for the web load faster than unoptimized images. There are a few things you can do to optimize your images for the web, such as reducing the file size and using proper file naming conventions. You can also use an online tool like Kraken Image Optimizer to help optimize your images for the web.
3. Use a content delivery network (CDN).
A CDN is a network of servers that deliver content to users based on their location. Using a CDN can help improve website performance by reducing latency and increasing availability. If you have multiple versions of your website hosted on different servers around the world, using a CDN
First, you will need to create a colorbar image.
To do this, first find an image that you want to use as your colorbar. You can use any image, but it should be a high-resolution image so that the colors will be accurate. Once you have found your image, open it in Photoshop.
Next, create a new layer in Photoshop and fill it with a solid color. This color will be used as the background for your colorbar.
Now, using the Rectangle Tool, draw a rectangle on your new layer. This rectangle will be used as the basis for your colorbar.
Fill this rectangle with a gradient of your choosing. To do this, select the Gradient Tool and then click and drag from one side of the rectangle to the other.
Once you have created your gradient, go to Image->Adjustments->Levels and adjust the levels so that they are evenly spaced out across the gradient.
Now that you have created your colorbar, all you need to do is save it as a PNG file and then upload it to Imgur or another image sharing site.
Next, you will need to include the colorbar image in your HTML code.
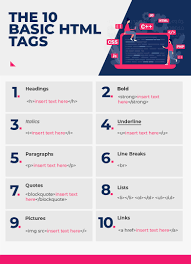
To do this, you will need to use the “img” tag. The “img” tag is used to insert images into HTML code. The “src” attribute defines the URL of the image. In this case, you will need to enter the URL of your colorbar image.
The width and height attributes define the width and height of the image in pixels. These values can be anything you want, but they should be large enough so that the colorbar is easily visible.
Finally, you will need to add a title for your colorbar image. This can be done by using the “title” attribute within the “img” tag. The title will appear when someone hovers their mouse over the image.
Finally, you will need to add some CSS code to make sure the colorbar image is displayed correctly.
The code you need to add is the following:
.colorbar {
position: absolute;
top: 50%;
left: 50%;
transform: translate(-50%, -50%); /* this makes sure that the colorbar is always in the center of the screen */ }
Now that you have added the CSS code, your colorbar should be displayed correctly on your web page!
draw a image
Preloading images is an important aspect of creating a smooth user experience. When done properly, images will load quickly and smoothly, without any hiccups. There are a few different ways to preload images, but the most common and effective method is to use JavaScript.
JavaScript provides a simple way to preload images that is effective and easy to implement. In order to preload an image using JavaScript, you will need to use the new Image() constructor. This constructor allows you to create a new image object with a given URL.
Here is an example of how to use the new Image() constructor to preload an image:
var image = new Image();
image.src = “https://example.com/path/to/image.jpg”;
Once you have created a new image object, you can set its src attribute to the URL of the image you wish to preload. Then, the browser will automatically begin downloading the image from that URL. Once the image has been downloaded, it will be cached by the browser so that it does not need to be downloaded again in the future.
There are a few things to keep in mind when preloading images with JavaScript. First, because JavaScript is a client-side scripting language, it cannot access files on the server without some assistance from the server-side code. This means that if you are using JavaScript to preload images, you must have already sent those images to
how to save slices as separate images in photoshop
Preloading images is a common practice in web development. It is used to improve the user experience by loading images before they are needed.
There are many ways to preload images, but one of the most common methods is to use JavaScript.
JavaScript Preload Image: 6 Steps To Include Preloading Your Images
In this tutorial, we will show you how to preload images using JavaScript. We will also provide some tips on how to improve the user experience with image preloading.
1. Choose The Right Image Format
When preloading images, it is important to choose the right image format. The two most common image formats are JPEG and PNG.
JPEG format is best suited for photos and images with lots of colors. PNG format is best suited for graphics and logos with fewer colors.
2. Sizing Your Images
Another important consideration when preloading images is sizing. It is important to size your images correctly so that they do not take up too much space on the page. If an image is too large, it will take longer to load. If an image is too small, it will look fuzzy or pixelated on the page.
3. Use A CDN Or Host Your Images Locally?
When preloading images, you have two options: use a content delivery network (CDN) or host your images locally. CDNs are a good choice if you have many visitors from different parts


